Worm composting: a small crew that turns kitchen scraps into fertilizer on your balcony
Every day, a handful of vegetable peels, tea leaves and eggshells piles up in the kitchen. Instead of throwing them in the trash, you can give them to worms living in a small box. A few months later, you have dark compost and a liquid fertilizer to feed your potted plants. According to the RHS, worm composting is an efficient way to turn kitchen scraps and small amounts of garden waste into nutrient-rich compost and a concentrated liquid fertilizer, but it doesn't replace a conventional compost heap. In this article, we cover everything from setting up the bin to harvesting the compost, with advice from the RHS, London's Natural History Museum, Garden Organic and Penn State University.
- The right worms: Not the earthworms from your garden, but composting worms that live in decaying matter (Eisenia fetida and its relatives).
- The bin: A sump at the bottom where liquid collects, a compartment on top where the worms work, and drainage holes (RHS).
- Temperature: According to the RHS, worms are most active at 18–25 °C (64–77 °F); they slow down noticeably below 10 °C (50 °F) and above 30 °C (86 °F).
- Feeding: Small amounts, often, chopped small. No meat, fish, dairy or fat (RHS).
- Moisture: Damp throughout but not wet (Penn State); if water pools, the worms can drown (RHS).
- What you get: According to the RHS, the bin fills up in 8–12 months; the liquid fertilizer is diluted at 1 part liquid to 10 parts water.
Which worms?
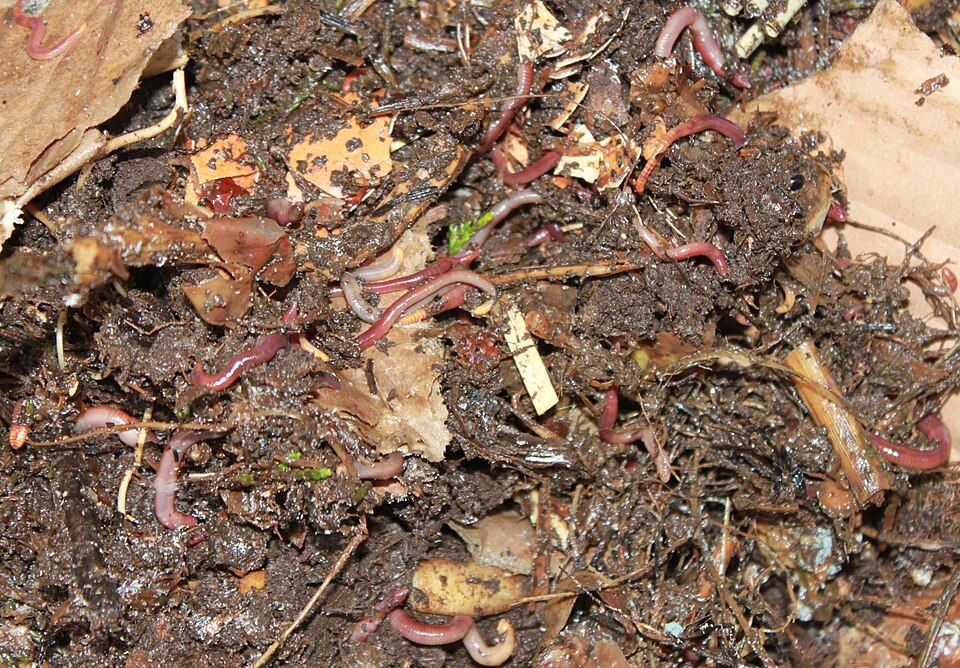
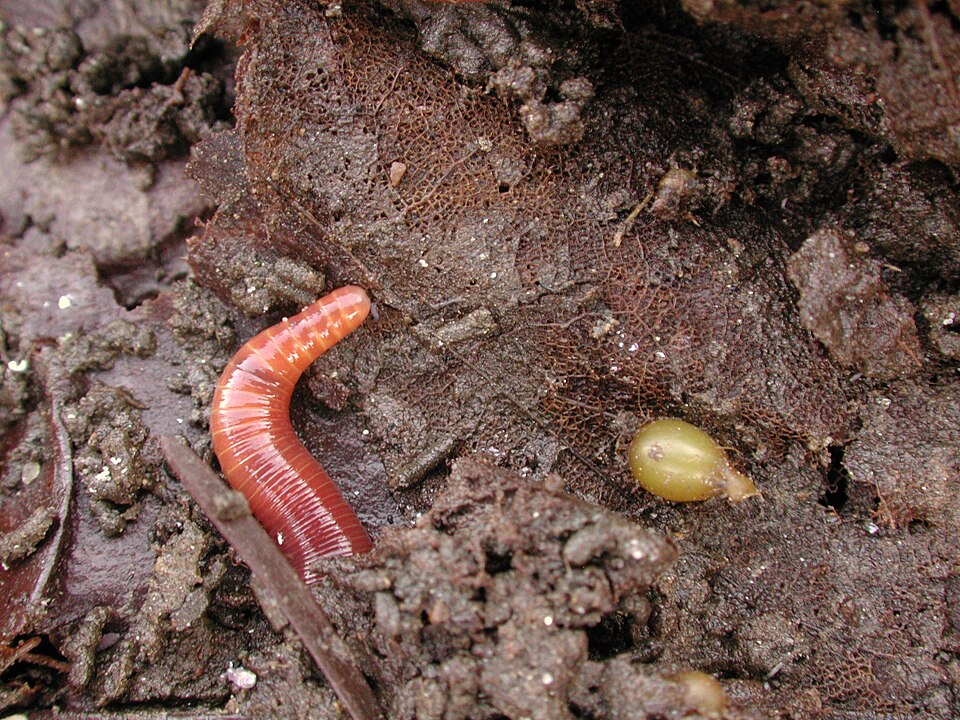
According to the RHS, composting worms don't live in soil; they live in decaying matter. They are smaller and darker red than the big earthworm you see in the garden (Lumbricus terrestris), and the earthworm isn't suitable for the job. The species the RHS lists are Eisenia fetida, Eisenia andrei and Dendrobaena veneta. According to the Natural History Museum, the most commonly sold species is Eisenia fetida. According to Garden Organic, this species lives in leaf litter, manure piles and under flowerpots in the wild.
The Natural History Museum says you can buy the worms from fishing bait shops or ask someone who already has a worm bin. Penn State Extension recommends starting with about 450 grams (1 pound), or roughly 1,000 worms; don't start with just a few dozen.
According to the Natural History Museum, composting worms have both male and female organs, but they still mate to reproduce. Depending on temperature, their numbers can double every 60–90 days. Except in winter, they lay small, yellow, lemon-shaped cocoons every 3–4 days; the young emerge about 23 days later. In a worm bin, they can live 2–3 years.
The bin: shallow, dark and full of holes
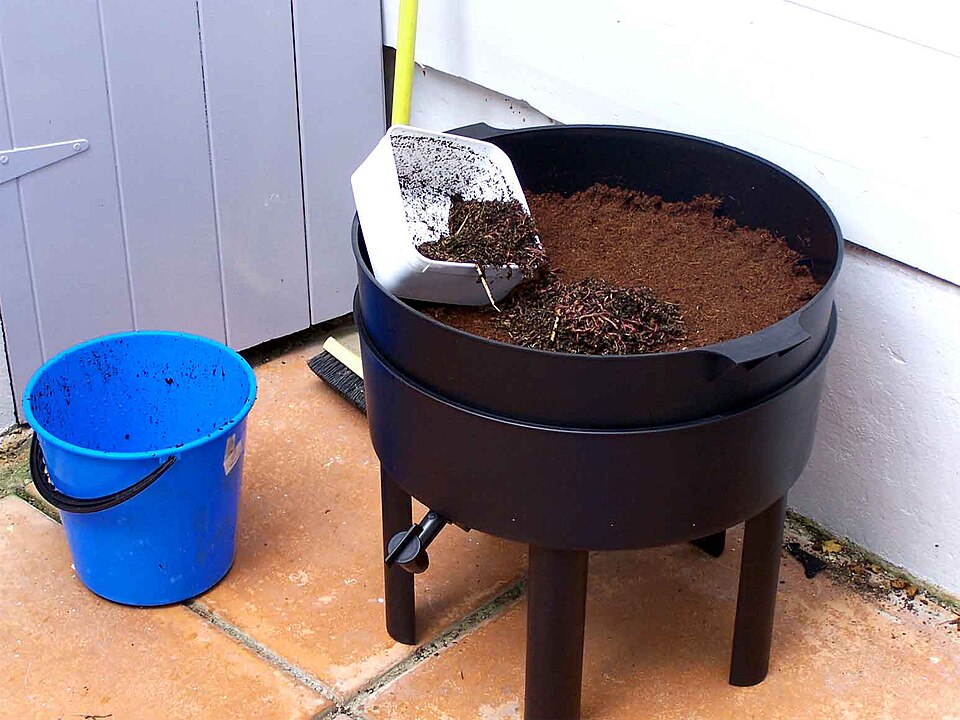
According to the RHS, a worm bin usually has at least two compartments: a sump at the bottom where liquid collects, and a compartment on top where the kitchen scraps go and the worms work. In stacking-tray bins, the worms move up into the new tray above, so you can take the finished compost from the bottom tray without sorting out the worms. According to the RHS, the bin needs drainage holes, and a larger surface area speeds things up.
If you want to make your own:
- Three boxes: The Natural History Museum recommends three plastic boxes measuring 40 × 50 × 20 cm, one with a lid. Drill plenty of holes in the bottom of two of them and a few in their sides; leave the third undrilled, since that's where the liquid will collect.
- Shallow and dark: According to Penn State, composting worms live near the surface, so deep, narrow containers such as buckets aren't suitable. Worms avoid light, so choose a dark, opaque container with a lid.
- Holes: Penn State recommends drilling 10 holes in the bottom and 10 in the sides near the top rim with a 1/4-inch (about 6 mm) bit.
- Bedding: The Natural History Museum recommends lining the bottom with newspaper and adding 3 cm of damp compost; the RHS recommends a layer of moist bedding, such as old compost or coir, about 8 cm deep. Penn State also lists newspaper torn into strips less than 1 inch (2.5 cm) wide and crushed dry leaves; don't use glossy magazine paper.
- Wait: Put the worms on the bedding, cover them and close the lid. The RHS and the Natural History Museum recommend waiting one week for the worms to settle. According to the RHS, the first layer of kitchen scraps should be no more than 8–10 cm deep.
Where should it go?
According to the RHS, worms are most active at 18–25 °C (64–77 °F). According to Garden Organic, Eisenia fetida struggles to survive above 35 °C (95 °F) or well below 5 °C (41 °F).
- Out of the sun: According to the Natural History Museum, direct sun can overheat the worms; a shady, north-facing wall is a good spot in summer. On a hot balcony, move the bin to a corner that doesn't get sun.
- Sheltered: The foot of a wall or fence works well. According to the Natural History Museum, in heavy rain make sure the lid is secure and the boxes don't flood.
- In winter: The RHS recommends a sheltered spot, such as a shed, that is neither too cold in winter nor too hot in summer. According to the Natural History Museum, worms stop working below 10 °C (50 °F); feed less in cold weather, and in very cold areas wrap the bin in old carpet or bubble wrap.
- Indoors: According to Garden Organic and the Natural History Museum, a well-kept worm bin doesn't smell and can be kept indoors. The RHS, however, doesn't recommend places like the kitchen or a balcony if the bin might be neglected; a neglected bin can smell.
What goes in, what stays out?
| Scraps | What to do |
|---|---|
| Vegetable and fruit scraps, tea bags, coffee grounds, eggshells | Add them (RHS). The Natural History Museum asks for plastic-free tea bags. |
| Onions, leeks, garlic | Add small amounts, or cook them first (RHS). According to Garden Organic, worms don't tolerate these well. |
| Citrus peel | The RHS recommends small amounts or cooked; Penn State doesn't recommend it at all. |
| Bread, pasta, cereal | Add small amounts (RHS); without sauce or butter (Penn State). |
| Newspaper, cardboard, shredded paper | Add in small amounts; no glossy magazine paper (RHS). |
| Meat, fish, bones, dairy, fat | Leave them out. According to the RHS, they attract pests and flies. |
| Tough leaves and woody waste | Don't add much; according to the RHS, they slow the system down. |
The rules of feeding:
- Little and often: The RHS recommends feeding small amounts often and chopping scraps into small pieces. According to the Natural History Museum, worms eat up to their own body weight a day, so don't overfeed. According to Penn State, 1 pound (450 grams) of worms in an established bin processes about half a pound to 1 pound (225–450 grams) of scraps a week.
- Bury it or lay it on top: According to the RHS, you can place food on top of the compost or bury it.
- If it isn't eaten, stop: According to the RHS, if food is left uneaten, stop feeding for a few days and let the worms finish the top layer first.
- Vacations: According to the RHS, an established bin can go up to four weeks without food.
Moisture, smells and little flies
According to Penn State, the bedding should be damp throughout but not wet. According to the RHS, worms need well-ventilated conditions and dislike waterlogging; when water builds up, the air supply is cut off and the worms can drown. Keep the lid on so the bin stays moist; add water only if it looks dry, and drain off the liquid that collects regularly.
- If it smells: According to the RHS, the cause is usually overfeeding. Remove uneaten food and wait until the worms start eating the top layer.
- If it's too wet: Drain the liquid; add shredded paper or cardboard to soak up moisture and improve airflow (RHS, Natural History Museum).
- If it still smells after draining: According to the RHS, the compost may be too acidic; sprinkle on a small amount of calcium carbonate (garden lime, ground chalk or ground limestone).
- Fruit flies: According to Garden Organic, they're harmless and increase in warm weather. Bury fresh scraps and cover the top with damp newspaper or cardboard. The RHS asks you not to use chemicals; they can harm the worms.
According to Garden Organic, worms gathering under the lid isn't necessarily a problem. But compost that is too wet or too dry, not enough food, overcrowding, acidity and the vibration of rain drumming on the lid can drive them out of the bin.
Harvesting the compost and the liquid
According to the RHS, a bin usually fills up in 8–12 months. You need to separate the worms before using the compost:
- In a stacking bin: According to the Natural History Museum, when the top box is full, swap it with the middle box and start feeding the emptied one. The worms gradually move up; you can then use the compost from the box they've left.
- Take from the top: According to the RHS, worms gather just below the food. Set aside the top layer, about 20 cm (8 in), and use it to restart the bin.
- Side to side: Penn State recommends pushing everything to one side of the bin and putting fresh, moist bedding and a little food on the other side; within a few weeks, the worms move over to the new side.
According to the RHS, worm compost is generally rich in nitrogen and potassium; it can be used as a soil conditioner or mixed into homemade potting mixes. The Natural History Museum recommends spreading it around plants as a top dressing. According to the RHS and the Natural History Museum, dilute the liquid from the sump at 1 part liquid to 10 parts water and use it as a liquid fertilizer. According to Garden Organic, this liquid can also be given to houseplants.
To meet other little decomposers that live among decaying leaves in the garden: pill bugs. More of our articles: Invertebrates.
Frequently asked questions
Can I use worms I dug up in the garden?
No. According to the RHS and the Natural History Museum, garden earthworms live in soil and aren't suitable for a worm bin. You need composting worms, which live in decaying matter.
Does a worm bin smell?
Not if it's well looked after; according to Garden Organic and the Natural History Museum, it can even be kept indoors. According to the RHS, a smell usually means overfeeding or too much moisture.
What should I do when I go on vacation?
According to the RHS, an established worm bin can go up to four weeks without food. Drain off the collected liquid before you leave; the RHS warns that worms can die in a wet bin, especially during vacations.

Keep track of your pet's care in TüylümLog vet visits, vaccine and medication dates, and we'll remind you when it's time. Share it all with your family in Home.
Sources
- RHS · Worm composting
- Natural History Museum · How to make a worm composter
- Penn State Extension · Vermicomposting Puts Worms to Work
- Garden Organic · Eisenia fetida – the heroes of your compost bin
- Garden Organic · Different composting methods
- Garden Organic · Should I be worried about small flies in my worm bin?
By Tüylüm · Published and last checked: October 28, 2026. Spotted a mistake? Write to [email protected] and we'll fix it right away. Photos are from Wikimedia Commons, used under the license shown below each photo.